 = Screen will go to sleep or dim as normal.
 = Screen will stay awake.
If you right-click on the coffee cup, you will see more options, like activating Caffeine for a specific amount of time on your computer.
 = Screen will go to sleep or dim as normal.= Screen will stay awake.
  So I have been a fan of Pixlr (pixlr.com) for quite some time now. Their online photo editor is quick and has a lot of great tools (see prior posts about it here and here). I've noticed other resources on their site before and have used a couple, but had never really spent any time with pixlr-o-matic until recently.
 You can either grab an image from your webcam or one already saved to your computer. I started with a quick pic from my webcam. Choose the effects you want to add, and a frame if you choose, then save your final product to your computer or to immio (photo sharing site). You can also use the randomizer button at the bottom to get randomly generated effects, overlays, and borders. It's right to left of the "gauge" (it looks very much like a shuffle button for music). I found I liked to use the random button and then just tweak the things that I want to. By using different effects a photo can be made to look old or futuristic, which could be a nice touch for pictures or photos that are used in a student project!


 Apps 4 iKids (@Apps4iKids)- This site was created to share apps that a mother has found for her son. Lists are included from various perspectives including her son's (5 yrs old) top 10 picks.
 e.ggtimer.com - There's a couple of things I really like about this timer. First, you can actually type in the time you want to use for the timer in the url, for example, e.ggtimer.com/5minutes, would automatically pull up a website with a countdown from 5 minutes. You type in any time amount here, as well as a few other cool things that you learn about on the site's main page.
 Teachit Timer - A very large, easy-to-follow output is displayed while the timer is counting down. You use sliders to input the time you would like to set. It also lets you select different final sounds. I really like the visual while the timer is counting down.
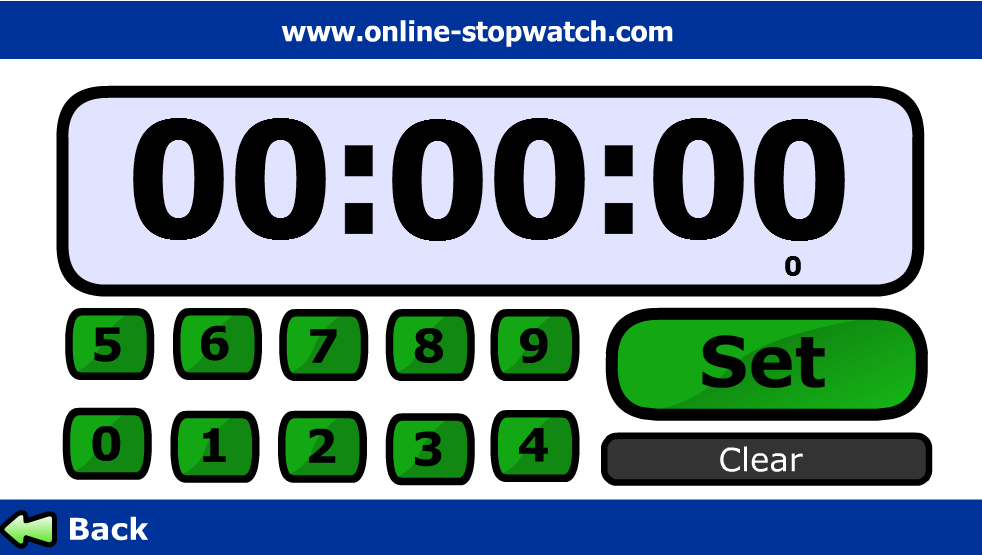 Online Stopwatch - This site can serve as a stopwatch or a timer. To use the stopwatch click the green arrow stopwatch link. You'll then be taken to a page that will allow you to start the stopwatch. If you need go back to the main page just click the provided "back" link. To use the timer function of the site, click the "Count Down" red arrow. Use the buttons on the screen to set your time, then click the "Set" button. From here you can start the timer.
 timer.onlineclock.net/ - This is a simplistic timer that can be shown quite large on your screen. Just use the links in the upper-left to adjust the size. Use the drop-down menu under the timer to set a time. The timer will begin as soon as a time is selected.


 |
| www.shwup.com |
"For those invited, there is no signing up, registering, or download required to view and contribute photos and video. To contribute to the album, it's as simple as replying to the email with an attachment..."Once people have contributed media to your album, you can create what Shwup refers to as a "muvee". You can choose the music and media that you want to include and then easily share the muvee with others.

 Storybird.com provides a great, and easy to use platform for creating stories online. To start, from http://storybird.com click on Start a Storybird Now. You'll then be able to browse and select the artwork that you'd like to base your Storybird on (this is my favorite option), or scroll down the page and explore by theme (also a good choice =). You can click to See More Art or See More Themes from both of these areas. You can also click Reload from the Image pages to view even more artwork! Once you decide on the artwork that you would like to use, click to Start a Storybird with this art. This is where the fun really begins...


