Organizing Email in Live.com (Part 1)
So this week has marked the beginning of using Windows Live (specifically live@edu) as our primary email service in our school district. In light of that, I thought I'd do a cross-post series for organizing emails in live.com. You have multiple options for organizing emails. You can assign categories, make an email a task, and/or put your emails in folders. For this post I'm going to go over sorting your emails into categories.
To use categories in your email...
- Hover your mouse on an email.
- On the right side of the email bar you will see a grayed out rectangle, click it.
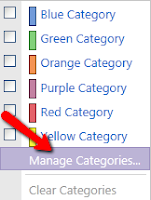
- If you don't care about the names of the categories and just want to apply a color, then select a color to apply it to an email. If you wish to change the names/colors of your categories, click on Manage Categories and follow the steps below.
- Delete the current categories by selecting them, then clicking Delete Category. Do this for all existing categories.
- Click Create New Category and assign a color and name for the categories you want to have.
- When you are finished, click OK and assign categories as described above.
Note - You can apply more than one category to an email =)
Another Note - You can filter by categories! At the top of your email just select Filter, then Category, and select your category.


Thank you for posting that, How about if you can tell us how you can add a picture to your signature, I tried by using an HTML code but no luck:)
ReplyDelete