- Open Outlook 2010 (Go to Start > Programs > Office 2010 > Outlook 2010)
- Click Next
- On the window that asks “Would you like to configure an Email account? Select Yes and then Next.
- Enter your account information for your Live Email.
- Make sure that you enter your complete email address.
- Click Next
- You will see Outlook process your account information, this should go pretty quickly.
- If you see a window prompting you for your password, enter your Windows Live sign-in information.
- You will probably want to click for it to “Remember my password” but if you do this, just make sure you are on your personal or teacher dedicated computer, and that if you step away from your computer you lock it (Ctrl + Alt + Delete, Lock this Computer).
- Next you should see a window that says “Your email account is successfully configured." Click Finish.
- When you are prompted with “Would you like to add a Hotmail Account?” Select No.
- Select to “Use Recommended Settings” and click OK.
Showing posts with label Windows Live. Show all posts
Showing posts with label Windows Live. Show all posts
Friday, August 19, 2011
Let's Get it Started
Wednesday, May 11, 2011
Organizing Email in Live.com (Part 2)
This is the 2nd post of a series for Organizing Email in Live.com.
There are a variety of options for organizing emails in Live.com. Last week I posted about using categories to organize your email. This week we will be looking at how to create folders and add emails to the folders in Live Mail.
There are a variety of options for organizing emails in Live.com. Last week I posted about using categories to organize your email. This week we will be looking at how to create folders and add emails to the folders in Live Mail.
- Log into live.com
- Right-click on your name from the left-pane
- Select Create New Folder
- Type in the name of your folder and press Enter
- From this point it's easy to move emails into folders
- Select one or multiple emails and either drag and drop them into the desired folder, OR
- Once emails are selected, click Move and choose Move to Folder, then select the folder you would like to move emails to.
Wednesday, May 4, 2011
Organizing Email in Live.com (Part 1)
So this week has marked the beginning of using Windows Live (specifically live@edu) as our primary email service in our school district. In light of that, I thought I'd do a cross-post series for organizing emails in live.com. You have multiple options for organizing emails. You can assign categories, make an email a task, and/or put your emails in folders. For this post I'm going to go over sorting your emails into categories.
To use categories in your email...
Another Note - You can filter by categories! At the top of your email just select Filter, then Category, and select your category.
To use categories in your email...
- Hover your mouse on an email.
- On the right side of the email bar you will see a grayed out rectangle, click it.
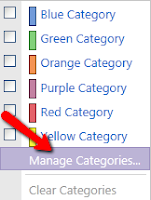
- If you don't care about the names of the categories and just want to apply a color, then select a color to apply it to an email. If you wish to change the names/colors of your categories, click on Manage Categories and follow the steps below.

Another Note - You can filter by categories! At the top of your email just select Filter, then Category, and select your category.
Subscribe to:
Posts (Atom)


