Wednesday, December 14, 2011

Great Holiday Activity

I was going through my Google Reader recently and came across a wonderful post from @EdTechSandyK. Her post is titled The Gift of Kind Words and she describes an activity she used with her students before getting into the field of Instructional Technology. So while I know I typically post about a web resource on Wednesday, I really think this is a wonderful idea and couldn't help but share her information. 

The idea is that each student draws a gift bow on a piece of construction paper and puts their own name on the "tag" of the present. The gifts are then passed around the room, with everyone writing kind words about the person on the present. She read through all of the words on the presents before returning them to the students. The wonderful thing is that she discovered her students always found something nice to write about each and every person. She describes the look of joy of that she saw on each students face when they received their "Gift of Kind Words". 

What a wonderful activity. Her post gives much more information and great insight to the activity. Please view her original post for more information.

Wednesday, November 30, 2011

Forvo | A Pronunciation Guide

Forvo is a site that provides many words in many languages, pronounced. Keep in mind that this is not a translation site, but rather a pronunciation guide. If you know a word, but aren't certain on how to say it, this is a great place to visit.

All you have to do to get started is search for a word, by default it will search all languages for the word, or you can select the language. You will then see a display of pronunciations, including a map of where these words were recorded...pretty cool. Click the play button next to a word to hear it (view example, this search was for the word "school").

If you want to see more about the languages with pronounced words on the site view this page. The site currently states that it has "1,094,357 words 1,169,294 pronunciations 281 languages" and this number is growing by the minute (see what it is when you visit and compare!). Check it out by clicking here!

Wednesday, November 16, 2011

Earth Time Lapse from the ISS

So I know it's a little late, and I'm sure many people have seen this video by now, but I couldn't let this "Webby Wednesday" pass without spotlighting it. What a great opportunity to discuss the world/time zones/weather in the classroom! If you view the video from Vimeo, and scroll down a bit you will see the shooting locations in their order. Super helpful indeed! =)


Earth | Time Lapse View from Space, Fly Over | NASA, ISS from Michael König on Vimeo.

Wednesday, November 2, 2011

Virtual Tours with Photosynth Panoramics

I want to share a super cool tool that I have come across that provides a great platform for virtual tours. It's fast, easy, and would be wonderful for classroom tours and creating virtual field trips. Microsoft Photosynth is a free tool that I have known about for a while, but recently I found an aspect of it that makes it even better to use than before (at least to me =).

Photosynth's purpose is to stitch together pictures in order to create virtual environments. This can be done by making a regular synth or a panoramic. See this page for more of an explanation of the difference. My new (to me) finding is the panoramics. They create a smooth environment where you can rotate 360 degrees around a room or space. See some awesome samples here or check out my (not quite as cool but still neat) panoramic below.


There is one little bobble in this panoramic with the trees in sky, but I thought overall it did great, 
and I literally did this in no more than 2 minutes!!

  1. To get started with Photosynth you do need to create an account using a Windows Live ID (you can also create a Windows Live ID from this page). Just go to Photosynth's main site and click Create Account at the top of the page.
  2. Once you have an account you have a couple of options on creating your Panoramic. You can either use pictures taken from a digital camera and upload them using Microsoft's Composite Editor. After creating your Panoramic just click the Publish to Web button to have it publish to the Photosynth site.

    OR - If you have an iPhone or iPad - by far the easiest option is to download the FREE Photosynth app (they say a Windows Phone app is coming soon, but for you Android users that just went awwww try using this app instead (thanks Ricky!)).

    The iPhone app for Photosynth is so easy to use (it is what I used for the panoramic above). You just launch the app, tap to start, and then start moving your phone, holding still briefly when you want it to snap a pic (the Photaf app for Android looks to work similarly). Easy peasy!!
  3. When you're done making your panoramic it will publish to your Photosynth account and you can view it there by logging in. You can also choose to make your panoramic listed or unlisted (use this option if you don't want people to be able to search and find your panoramic), add highlights, and share your panoramic through email or Facebook.

I hope you try it out and have some fun!

Wednesday, October 26, 2011

Periodic Table of Videos

The University of Nottingham has provided a pretty fantastic version of the Periodic Table of Elements, where each element is a link to a video with or about the element. The videos don't seem to be more than 10 minutes in length, they are entertaining, and there is a video for each of the elements...pretty cool! Check out The Periodic Table of Videos to view this great resource.

Wednesday, October 19, 2011

National Day on Writing October 20

Wednesday, October 20 is the National Day on Writing. To support this day I thought I would post about to some great writing resources that I have come across. The first is site that is a contest for the National Day on Writing.

Figment.com Contest - Why I Write: Submissions accepting submissions from September 28 - October 29. The question is simply "Why Do You Write?". View more info from Figment: Why I Write.


QuietWrite - quietwrite.com is a an online platform for writing. It provides a clutter and distraction free screen as a place to write. Get started at quietwrite.com


Oneword - Oneword.com offers a free service site that prompts you with one word, and then gives you 60 seconds to write about that word. Ideal for high level 4th & 5th elementary and older students.


Scholastic Story Starter - A quick everyday-kind of writing activity. You just enter your name, pick your grade level, and spin the wheel to generate a story starter. I learned of this site from Cindy's blog (thanks Cindy!),  Tucker Tech Talk.

Wednesday, October 12, 2011

Make Any Pic Talk with Blabberize

Blabberize provides a great, free, easy to use application for making photos or images talk. You do not have to have an account to use it, but if you want to be able to access all of your prior Blabberize creations from the site in the future it might be a good idea to make one.

View student project examples of Blabberize here and here.

Necessary Materials...
  • Digital Picture or Image (This is what you will make speak)
  • Blabberize.com
The whole process start to finish is easy. All you have to do is follow the steps below or just view the video found at the end of this post...
  1. Go to Blabberize
    **Note - The video that you will see on the homepage of the site is funny, but I would recommend that you do not have the students view it.
  2. Click Make.
  3. Click Browse to select the picture that you would like to use.
  4. Click and drag the points around the mouth.
    **Tip - Make the side green points extend as far the edges as you want the mouth to be. The green point at the bottom will dictate the direction that the mouth moves.
  5. Click the Arrow to go the next screen.
  6. Select your sound source. At this point you can either record straight from your computer, upload a voice recording, or call in a voice recording.
    **Tip - If you don't like where the mouth placement is and want to make a change, click the small mouth icon, and then click the area to change.
  7. Once you've added your sound, click OK to complete.
  8. Save your Blabberize creation!

    Wednesday, October 5, 2011

    Online Timers that are Great for Teachers!

    So I'm revisiting a topic I have posted about before, but timers are such a great resource for classroom management, and the internet is so accessible, I think it's super wonderful to mingle the two together.

    The following are my favorites, plus a few. I have them pretty much in order starting with my favorite, but view them all to see for yourself which one you prefer :) You can view my original post about timers too if you are so inclined.

    e.ggtimer.com - There's a couple of things I really like about this timer. First, you can actually type in the time you want to use for the timer in the url, for example, e.ggtimer.com/5minutes, would automatically pull up a website with a countdown from 5 minutes. You type in any time amount here, as well as a few other cool things that you learn about on the site's main page.

    Teachit Timer - A very large, easy-to-follow output is displayed while the timer is counting down. You use sliders to input the time you would like to set. It also lets you select different final sounds. I really like the visual while the timer is counting down.


    Online Stopwatch - This site can serve as a stopwatch or a timer. To use the stopwatch click the green arrow stopwatch link. You'll then be taken to a page that will allow you to start the stopwatch. If you need go back to the main page just click the provided "back" link. To use the timer function of the site, click the "Count Down" red arrow. Use the buttons on the screen to set your time, then click the "Set" button. From here you can start the timer.

    timer.onlineclock.net/ - This is a simplistic timer that can be shown quite large on your screen. Just use the links in the upper-left to adjust the size. Use the drop-down menu under the timer to set a time. The timer will begin as soon as a time is selected.

    Class Timer - This is a little bit smaller version but it does a great efficient job. It counts up or down depending on the option that you select.

    Wednesday, September 28, 2011

    Want to Book Parent Conference More Easily??

    VolunteerSpot is a great site that offers a free resource that would be great for scheduling conferences. Parents can sign up for pre-determined times by clicking a link (from a site or by email). See the steps below to get started.
    1. Go to www.volunteerspot.com
    2. Click the Register button and enter your information (I always do uncheck the "receive emails" box just because my mailbox already gets too full :) You will have to verify your email address by clicking a link in an email that VolunteerSpot sends you (mine came very quick) and then Login to the system.
    3. Click the Create New Activity button
    4. Enter the details for your Activity. In using this site for parent conferences you will want to name your activity something like "Parent Conferences" and include your school name (this info will be at the top of the calendar when the parents are signing up). For the welcome message I would say something like "Please sign up for a time that you are available for a conference. All conferences are scheduled for 15 minutes. I look forward to seeing you soon!"
    5. The next step is for you to add the times that you would like parents to register for. To do this...
      1. Click a day on your calendar
      2. Select Plan This Day
      3. Click Add a TO DO Task
      4. Enter your details 
        1. Name: Parent Conferences (the first time you type this copy it, then you will be able to just paste the text in for the rest of your times)
        2. Limit the number of people that can sign up to 1 (this is super important so that you're not double-booked)
        3. Add a Start Time (and End Time if you'd like)
        4. Save
      5. Repeat steps 4 & 5 above for the rest of your appointments
      6. Once all of your times are scheduled in the calendar you will be prompted to send a draft email. It will default to just send to you so that you will be able to see what parents would (you can come back later and email the invitation to parents if you so desire OR see the next step).
      7. Click the gold button on the left that says Create a Link. Click to Generate the link and then copy either the link (which you can put on your website or in an email), or copy the code to embed a button on your site that parents can use to register (see example here).
    If you use this site to schedule your conferences this year let me know how it goes. Also as the "Event Organizer" you have the ability to schedule people for a time so if a parent can't access the page there is an alternative. I know I wish I had this tool available to me when I was in the classroom. I would have loved to not have to keep up with those tiny sheets of papers and individual emails ;) Go to www.volunteerspot.com to get started.

    Wednesday, September 21, 2011

    Symbaloo - Fast links, Fun interface

    Symbaloo offers a great way to sort out site links. You can pick from pre-organized Symbaloo pages (see here) or create you own (see my example, screen shot below).


    With a free account you can create your own start page and have a link to post on your site in order to share it with your students. To get started with creating your own Symbaloo for education, follow the steps below, or view the video at the bottom of the post.
    • Go to edu.symbaloo.com
    • Option A - use the Symbaloo you see here
      Option B - click Create free account (in the upper-right) to make your own and save it
      • Enter your name, email, and a password (you might want to uncheck "I want the inside scoop" before you select to "agree to Symbaloo's..." and click Create my account
      • Click Get started with your webmix (you'll see a pop up after this to Set as my home page, you can follow the directions, or just close that window)
      • Click on blank tile space to add a site
      • Select Click here to create your own tile
      • Enter your site address select your options, then click to Add tile to webmix
      • You will see your newly created tile, just click it and drag it anywhere on your webmix

    Thursday, September 15, 2011

    Quick Google Searches


    Google is a service that many of us are quite familiar with, but there's more to Google than meets the eye. For example, did you know that by simply typing "weather" you will get the current weather and the next 4 days forecast for your current location, and it gets even better! Quickly find conversions, time, definitions, when the sun will rise and even more. Check out the quick (I promise it's short ;) video below.


    If you like these tips and would like to know even more, check out Google's Features page by clicking here.

    Wednesday, August 31, 2011

    QR Codes: What are they and are they useful to me?


    QR codes are something that most of us have seen, but may not have used. They look like the image to the left and if you scan them with your smartphone they link you to information (This one goes to my Twitter page).

    What Are QR Codes?
    In short, QR codes are images that can be scanned using the camera on a smartphone through a QR code scanner app. Multiple apps are available for every smartphone (just search your app store for "QR Code"). Once you scan one of these codes, they take you to designated information. It may be a website that appears, a business card, or even a phone number with a link to add the person as a contact on your phone.

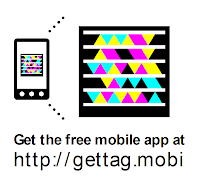
    A variation of a QR code is  Microsoft Tag. These can be colorful and even have images on them (see example to the right). They do basically the same thing as the QR code but are a little more versatile. You do typically need to have a different app on your phone to scan these codes and you will usually find a link to that app with the code you want to scan.

    How Are QR Codes or Microsoft Tags Useful to Me?
    As an educator you may want to put your QR code or MS Tag on a newsletter you send home. It could link to more information on your website, or to "Like" your Facebook page (see QR code at the end of this post). You might put one on your email signature that links to your website. You can have as many QR codes as you want that link to all different things! How fun is that??

    How Do I Get One?
    Go to a site like this QR Code Generator. What I like about this one is that you can pick from a list of the many different choices your code can link to(Plain Text, Website, Phone Number, Email Address, Facebook Like & more). Just pick the information type, enter it, and download your QR code image to use wherever you would like. Notice that the less info or shorter url that you put into your QR code, the simpler the code looks, and the faster it will scan.

    To create a Microsoft Tag a little more work is involved but it's still simple, plus you will be able to download any tag in the future because it's connected to your account. Go to this page and click to create a tag. You will have to sign in with a Windows Live ID, then you can go from there.

    Try it Out & Have Fun!
    Like EM-S ISD
    Instructional Technology
    on Facebook!


    Wednesday, August 24, 2011

    Virtual Math Manipulatives

    The start of school means fishing out your teaching supplies and often math manipulatives to help bring the *something shiny* into your lessons. Maybe you can't find all of your base ten blocks, or your play money, or those super nifty fraction pieces. Have no fear...the web is here =)

    There are many sites that offer free online math manipulatives in SO MANY formats. Below you'll find a list of resources for math manipulatives and activities. I'm highlighting the ones I know and love, but please add your own if I missed something fantastic!


    Illuminations: Resources for Teaching Math - http://illuminations.nctm.org/
    The National Council of Teachers of Mathematics has a fantastic site that offers MANY resources. To get to the activity resources, click on the Activities link from the main page. You can then search by a grade range or select all grades to search. The resources here are numerous and display quite large on your screen.


    Some of my favs are: Equivalent Fractions, Grouping and Grazing (for counting, addition & subtraction)

    eManipulatives - http://www.eduplace.com/kids/hmtxm/ 
    This is a Houghton Mifflin Harcourt site that has math emanipulatives sorted by grade level. Follow the steps below.
    1. Go to  http://www.eduplace.com/kids/hmtxm/ 
    2. Select your grade level (Or just go to 5th grade as it seems to have all of the manipulatives listed =)
    3. Click the link for eManipulatives
    4. Pick from the list of available manipulatives.
    Some of my favs are:  Coins and Bills, Base Ten Blocks, and Number Lines

    National Library of Virtual Manipulativeshttp://nlvm.usu.edu/en/nav/vlibrary.html
    I really like the setup of this site that is published by Utah State University. On the main page you will see a grid sorted by skills and grade level, just click the cell you want to get started! 


    Some of my favs are: Color Patterns, Bar Chart
     Math Playground: Math Manipulatives - http://www.mathplayground.com/math_manipulatives.html
    This site contains some great manipulatives and models for math. From the link above you will get to the main page that contains all of the math manipulatives available on this site. I really like that there are preview pics of the tools so that you can easily see if it's along the lines of what you're looking for. Just click the one you want to use to get started.

    Some of my favs are: Fraction Scale & Math Bars

    Friday, August 19, 2011

    Let's Get it Started

    I think I've been right along with everyone else in the craziness of this week. We had a wonderful convocation with an inspiring speaker, Mark Sharenbroich (see his story and more info at http://www.nicebike.com) and I know since then we've all been running full pace getting things ready and re-evaluating what we can do differently and improve upon. On the note of getting things ready...in our district we all came back to a wonderful addition on our computers, Microsoft Office 2010 (a special thank you is deserved to all of the technicians that worked hard through the summer to get this done). The application I'm going to give you steps for today is Microsoft Outlook 2010. This is a great way to streamline efficiency in your email program and much faster than accessing email through going to the website. It takes about a minute (yes I'm serious, one minute) to setup and it's super duper easy, so let's get started...


    1. Open Outlook 2010 (Go to Start > Programs > Office 2010 > Outlook 2010) 
    2. Click Next
    3. On the window that asks “Would you like to configure an Email account?  Select Yes and then Next
    4. Enter your account information for your Live Email.
      1. Make sure that you enter your complete email address. 
      2. Click Next 
    5. You will see Outlook process your account information, this should go pretty quickly. 
    6. If you see a window prompting you for your password, enter your Windows Live sign-in information.
      1. You will probably want to click for it to “Remember my password” but if you do this, just make sure you are on your personal or teacher dedicated computer, and that if you step away from your computer you lock it (Ctrl + Alt + Delete, Lock this Computer). 
    7. Next you should see a window that says “Your email account is successfully configured."  Click Finish. 
    8. When you are prompted with “Would you like to add a Hotmail Account?” Select No.
    9. Select to “Use Recommended Settings” and click OK.

    Friday, May 20, 2011

    EM-S ISD Tech Integration Conference

    We are so super excited to be having our first Technology Integration Conference here in EM-S ISD on August 3rd & 4th! Need more info...check out the video below =)

    GoAnimate.com: Summer Technology Conference 2011 by Becky501

    Like it? Create your own at GoAnimate.com. It's free and fun!

    Thursday, May 19, 2011

    YouTube for Students through the Educational Video Library

    I just found this site with great information from Lightspeed. Thanks to Mr. Houser for the info (and visit his site for info on creating your own YouTube channel). You may not realize that you can have students safely navigate to view YouTube videos within the district, but to do so, you need to take advantage of the Educational Video Library. To learn how to submit YouTube videos through this site within EM-S ISD click here. Visit the Lightspeed wiki (below) for detailed directions on submitting videos to the Educational Video Library.

    End-User 'Safe Video' Instructions - Public Info - Lightspeed's Support Wiki

    Wednesday, May 11, 2011

    Organizing Email in Live.com (Part 2)

    This is the 2nd post of a series for Organizing Email in Live.com.

    There are a variety of options for organizing emails in Live.com. Last week I posted about using categories to organize your email. This week we will be looking at how to create folders and add emails to the folders in Live Mail.
    1. Log into live.com
    2. Right-click on your name from the left-pane
    3. Select Create New Folder
    4. Type in the name of your folder and press Enter
    5. From this point it's easy to move emails into folders
      1. Select one or multiple emails and either drag and drop them into the desired folder, OR 
      2. Once emails are selected, click Move and choose Move to Folder, then select the folder you would like to move emails to.

    Wednesday, May 4, 2011

    Organizing Email in Live.com (Part 1)

    So this week has marked the beginning of using Windows Live (specifically live@edu) as our primary email service in our school district. In light of that, I thought I'd do a cross-post series for organizing emails in live.com. You have multiple options for organizing emails. You can assign categories, make an email a task, and/or put your emails in folders. For this post I'm going to go over sorting your emails into categories.


    To use categories in your email...
    • Hover your mouse on an email.
    • On the right side of the email bar you will see a grayed out rectangle, click it.
    • If you don't care about the names of the categories and just want to apply a color, then select a color to apply it to an email. If you wish to change the names/colors of your categories, click on Manage Categories and follow the steps below.
      • Delete the current categories by selecting them, then clicking Delete Category. Do this for all existing categories.
      • Click Create New Category and assign a color and name for the categories you want to have.
      • When you are finished, click OK and assign categories as described above.
    Note - You can apply more than one category to an email =)
    Another Note - You can filter by categories! At the top of your email just select Filter, then Category, and select your category.

    Wednesday, April 27, 2011

    Scribble on any website with Markup

    Markup.io is fast way to make marks on any website. From markup.io's homepage you can practice some of the basics shapes that you can draw. Just use your mouse, or if you have an interactive whiteboard or projector this would be a great time to use that too. Practice drawing a scribble (that's my term for it), a circle and an arrow from here.

    To start using markup.io, click and drag from the "Get Markup" button to your bookmarks bar on your browser. If your bookmarks bar is not visible then there should be an option in your browsers View menu to make it visible. You could also just right-click in the portion of your browser next to your tabs and click to add a checkmark next to "Bookmarks Toolbar" or "Favorites Bar" for Internet Explorer. Once you've got a bookmark for "Markup", then from ANY website click the "Markup" button on your browser and start doodling =) When you click the "Markup" button from your Bookmarks bar you will see a tool bar display in the upper-right of the website where you can change your color, add text, or change the tool type.

    I think this could be very useful in the classroom, particularly on map sites or images. See an example of a page I marked up below =)

    Wednesday, April 13, 2011

    Take out the clutter with Quietube

    YouTube is a great resource for educational videos. I've spoken to teachers that are concerned about showing videos from YouTube in their classroom because of all the extra "stuff" that's on a YouTube page. This is a very valid concern. A great solution to show YouTube videos in an educational setting is Quietube.

    What is Quietube? It takes the YouTube video you're currently viewing and puts it on a blank screen, with no suggested videos or comments.

    How does QuietTube work? 
    1. Go to quietube.com 
    2. From this site drag the button that says "quietube" into your bookmarks bar of your browser (If you don't have a bookmarks bar visible in you browser go to View>Bookmarks Bar). It super easy from here. 
    3. Find the YouTube video you'd like to use, and then from that video's YouTube page click the quietube button from your bookmarks bar. 
    4. That's it! Your video is viewable in this format and you can save the url or even click the button below the video to get a short url. Use this link to show the video to your students. Click the pic below for an example.

    For emsisd teachers...want more info on Visual Thesaurus? Check out www.emsisd.com/vt.

    Wednesday, April 6, 2011

    Create randomized bingo cards with print-bingo.com

    In looking for a bingo card builder this past week I came across this site. I've used others in the past, but this one gave the ability of choosing whether to have a free space (you choose the text), whether words are column specific or can be randomized, text size, and card size.

    1. To get started just go to Print-Bingo 
    2. From the homepage you can click "I've read enough..."
    3. Select the type of card you'd like to create, to input your own words/phrases, choose "Custom bingo cards with your own word or phrase lists". (Also checkout blank cards, and the template word list cards)
    4. Just one more link to start creating, click "Create custom bingo cards"
    5. Make your selections for the cards. 
      • Pay special attention to the center square, and if you make it free, enter the text for that space.
      • If you do not care if the words vary with the columns they are placed in from card to card, then make sure and choose "A word can appear in any column" (makes for easier entering). 
      • Change the text and card size if you so desire.
    6. Enter your words/phrases. If you selected "A word can appear in any column" in your options then just enter all of your words/phrases in one column. 
      • Make sure and enter (at minimum) 24 words/phrases.
      • Separate each word/phrase on a line by pressing enter after each.
      • Make sure that there are not any blank spaces in any of the bingo columns. If there are, then blank squares will be on your cards.
    7. The last option allows you to choose if you want to share your word list with their company or not.
    8. Click "Submit"
    9. Click "Click here to get your first set of custom bingo cards"
    10. If you like what you see, click the Print or Save button!

    Important Tip!! Need more cards?? or did you have an error on your current cards?? easy fix, just click the "Go Back" link that is displayed to the left of the cards. You will be returned to the screen where you entered your data. Make any changes you need, or if you just need more cards, click "Submit" again (you may want to change your share setting if you had previously set to private as this will revert).

    Instructional Technology at EM-S ISD has gone social =)

    In light of the changes on the horizon for applications in technology, and in an attempt to make this information more accessible, Instructional Technology for Eagle Mountain-Saginaw ISD has gone social =) with Facebook & Twitter, and have also began a Blogger blog in order to post "Tips & Tricks" for these applications. The goal is for people to access through the format that they are most comfortable with in order to learn about these tools.

    Interested in the info? Check out...

    Friday, April 1, 2011

    Google Motion, if you haven't seen it yet

    I know this has been circulating all around today, but if you've missed it...check out Google Motion. I hope everyone's had a wonderful day!


    =) Becky

    Wednesday, March 30, 2011

    Read it Later + New Blog Design

    Read it Later is a resource that I now find myself using on a regular basis. It offers a very similar service to InstaPaper if you are familiar with that. Read it Later allows you to save webpages and articles to read later, even if your offline. Both services also offer the options to read your items on a computer or many mobile devices. The idea is that if you are on a webpage and either want to save it for later, or don't have the time to finish reading it then, you can "Read it Later" and have the page available to read on your computer or mobile device at a later time. Many other applications are adding support of Read it Later so that while browsing articles you can add to "Read it Later" with the click or tap of a button. This is usually found in the same menu location where you might forward an article. One of the benefits I see to using Read it Later is that they offer apps for most smart phones including iPhones, Android, Blackberry, and Windows Mobile. To see even more options for devices that have support for Read it Later view this page.

    I hope you like the new look to the blog! I began having some trouble with the template I was using before so...viola! =)

    Thursday, March 24, 2011

    Google Book - 20 Things I Learned about Browsers and the Web

    So I'm sure I should've seen this before, but I haven't and it's quite cool! In light of Google's recent release of a magazine, Think Quarterly (which seems to be a bit over-run today) I stumbled across a prior release of Google's... 20 Things I Learned about Browsers and the Web. It is a beautifully presented "book" that goes through "20 things" about the web. It ranges in topics with "things" such as: What is a Browser, Cloud Computing, HTML5 and Malware. I think if you've heard words buzzing around about the web that you're not quite sure it's definitely worthwhile to check out. If you feel like you know quite a lot about the web it's still worth seeing the way that they've used HTML5 to create this book. I especially love the switches at the bottom where you can change the background (light or dark) and zoom in or out. The illustrations, by Christoph Niemann are quite enjoyable too!

    Wednesday, March 23, 2011

    The impact of the earthquake in Japan

    In the past couple of days I've come across some very informative sites that show and explain some of the circumstances in Japan. The first site listed is particularly helpful in really seeing the large changes that have occurred as a result of this tragedy.

    This site, presented by The New York Times, was shared with me by a colleague in my district and it is the first I've seen that provides an interactive comparison of impacted regions. When you open the site you will want to move your mouse to the center of the images, then click and drag to move the slider. The slider serves to move the overlay of current images of the same area.

    This second site I learned of from @edtechsandyk through Twitter. The article, presented by The Washington Post does a great job of explaining the importance of the written language and how communication is being delivered amidst this tragedy. In this day of modern communication through technology I think it serves well to remind us adults and students of the importance of written word. Check it out here.

    Animated time sequenced map of the earthquakes in Japan. This article references and links to a map that shows the depth, location, and magnitude with a counting timer of when the earthquakes struck.

    Larry Ferlazzo (@Larryferlazzo) provides a large list of additional resources for learning updated information on the Japan earthquake on his blog here.

    Wednesday, March 9, 2011

    Great Everyday go-to sites for Classroom Use

    I wanted to feature a few sites that are awesome go-to tools for classrooms. Each one can be used at anytime during the day with a multiple of lessons, and used by the teacher (whole group) or by students. Take a look and think of the possibilities! =)

    http://e.ggtimer.com/ - Quick and easy to use timer. Large print with countdown so it is great for classroom use!

    http://www.scribblemaps.com/ - It uses Google Maps (something we already know)  ;) but adds the ability to mark it up with arrows, lines, shapes, and words. Great for teacher demo with the whole group, or for individual student use. Consider students using it to create a map of their community,state, or country by identifying and marking major buildings and sites.

    http://markup.io/ - Markup.io provides a way to mark-up any webpage that you want. To use it you just have to drag the bookmark image to your bookmarks bar (or install the chrome extension if you're using the Google Chrome browser), and then when you're on a site that you want to mark-up click it!

    https://bubbl.us/ - Create mind maps. You can get started right away by clicking in the "Start Here" bubble, then just hit enter to create a new bubble or ctrl+enter to add a stem or "child bubble".

    Monday, March 7, 2011

    Flipboard for iPad, definite like

    I've been using Flipboard for a good amount of time now and feel like I can truly say I like it. I've passed the point of using it just because it was new & shiny (the true test) and am still going to it on my iPad daily. For those of you that aren't familiar, Flipboard puts various feeds (of your selection) in a magazine style format. It features some articles or posts more prominently, but you can tap on any to make them full screen. I really like the fact that when zoomed in on a story I can share the post very easily & see others that have tweeted the post too.

    I really like to have various site feeds set up as sections in my Flipboard. Particularly sites like Mashable Technology and ReadWriteWeb where I can see multiple sources of information. I also setup my Twitter, Facebook, and Google Reader feeds but have found I don't visit these sections as often as my others. Overall, I think Flipboard provides a fun way to view the news & share what you're reading & best of all it's free-ee in the App Store!

    Sunday, March 6, 2011

    Re-involving myself, or at least trying

    I got involved in Twitter originally wanting to be a part of a PLC. That's also the main reason I began this blog. I'm in the field of educational technology and believe in furthering my own learning and networking with others in this field. I also definitely believe in the role that these platforms play in this equation.

    I jumped in fast (insert shocking gasps from those who know me) and launched a professionally focused twitter page and re-located my blog to a place that I thought would be easier for others to reach.

    I found an ed tech list to follow and sent out my first tweet anxiously awaiting replies from others in the ed tech world...and then was a little disappointed when this did not happen immediately. I collected myself and realized that I needed to invest some time in this. I began reading tweets daily, and began blogging more regularly. I followed more people on twitter, and then a crazy thing happened, I stopped reading them quite as often.  The good side of it is that I have kept up this blog. Though if I'm honest, my original goal was to post a minimum of 3-4 times per week, and the reality is it's been more like 1-2.

    All of this to say I'm going to try again...and while thinking this I decided it might be a good idea to share the mistakes that I made the first time around, and proclaim my current goals.

    Mistakes

    1. I began reading many blogs (I use Google Reader), but failed to comment and become an active participant = I was a lurker.
    2. I published tweets from my blog but didn't not insert any thoughts or personality = I shoved my own posts out there without any personal touch.
    3. I read tweets from others but did not re-tweet, converse, or participate in any chat sessions = repeat lurker.
    Overall mistake = not being actively involved, I was merely a bystander.

    Goals
    1. Make my twitter follows more manageable in number (for now), and read daily.
    2. Tweet even when I have not published a blog post, ie when I see something interesting that is related to the field or have found a new (to me) resource. Even if I think others may already know about this resource to some degree.
      See this one is a biggy to me. In the past, I have come across great (to me!) resources, but then thought, eh everybody else probably knows about this, and not posted anything about it, only to see a few new posts about it later.
    3. Write a new blog post a minimum of 3 times a week, not just when I find a new resource. Share current concerns from my field or ideas for improvement. 
    Overall Goals = Read tweets daily, tweet regularly, and blog at minimum 3 times a week.

    I will try to stick to these goals. However, being the easily distractible person that I am (once again, insert gasps of shock from those who know me) I realize I may fail at times, but if I do, I'm going to try again, and hopefully get better the next time around!

    Thursday, March 3, 2011

    PDFmyURL Saves website as pdf fast!

    PDFmyURL provides a service that lets you generate a pdf of ANY web address that you enter. This could be super helpful when you need to save what's displaying on webpage today when it may be updated and changed tomorrow. Additionally if you want to have a file on your record of something that you've seen this is a fast and easy way to do that. All you have to do is go to pdfmyurl.com and then enter the web address in the window.


    Once you've entered an address just hit enter or press the button to the right. The website will then save and you'll see a pdf appear...pretty cool!

    Thursday, February 24, 2011

    Interactive Skeleton Anatomy with eSkeletons

    eskeletons.org is a site created by the University of Texas at Austin. It provides a great interactive environment for analyzing and interacting with skeletal structures. Their purpose is to provide...
    ...an interactive environment in which to examine and learn about skeletal anatomy...View the bones of both human and non-human primates and... gather information about them from our osteology database.
    You can select the skeletal structure you wish to view by either clicking the name or selecting the figure.


    If you click on the Comparative Anatomy link you can make various selections and view the images from the different species side-by-side.

    Tuesday, February 22, 2011

    Share a Snip from a YouTube Video

    Have you ever wanted to share just a little part of a youtube video? snipsnip.it provides a service that allows you to insert a link to a youtube video and then shorten that link so that a specific part is shareable. Check it out by clicking here.

    Wednesday, February 16, 2011

    Min.us improved!

    I've just found out that an already great site is now even better! If you don't know about min.us check out my prior post about it here. Basically the site provides a crazy simple setup for sharing. You can drag a pic onto the site and easily share from there. Brilliant right? Well now min.us has come out with new features such as being able to share music & documents, as well as images. You can also select multiple files on your computer (hold Ctrl on your computer as you click to select more than one) and drop them all in to receive one link to share. You just have to drag any file onto the window of the page and drop it in.


    Min.us has released desktop versions for Mac, Windows, and Linux. I've just downloaded the Windows version and it seems to work great. It just puts a small icon in your system tray where you can drag your files to and receive a link to share from there. For more info and options you can view their FAQ page here.

    Tuesday, February 15, 2011

    Doodle 4 Google still open

    If you're not familiar with the Doodle 4 Google program you can view more info here. The gist of it is that one lucky student will have their "doodle" featured as the Google logo for one day, and earn a $15,000 scholarship, plus more. Doodles this year must follow the theme, "What I'd like to do someday..." and registration will close at 11:59 Pacific Time on March 2nd. They've made some changes this year including parents can now register their children, and there is no cap for the number of doodles that a school can submit. That's just the basics though, if you're interested in more I highly suggest that you read through their contest rules.

    Wednesday, February 9, 2011

    Social Networking & more for this classroom

    Edmodo.com is a great way to communicate with your students online in a secure way, and best of all...IT'S FREE!!!!. The platform was created by educators and made for the classroom. Some of the features of Edmodo include being able to post notes to students (they can respond back to you or the whole class), attaching files to your post, or posting links.

    The way it works is pretty simple. As the teacher you register for an account. Once your account is created you can create your classes. This could be just one class (ex. Mrs. Burnett's) or multiple (ex. Math p.1, Math p.2...). With each class that you create you get a code. Students then sign up for their own accounts then enter the code for your class. It's good to note that students can have multiple classes associated with their account (Parents can also sign up for accounts so that they can view their child's account).

    Once everything is created you can get started posting to your class. As the teacher it is important that you have conversations with your students before they start using Edmodo about appropriate academic behavior online. I would also make sure and mention to your students that what they post can either be a direct message to you the teacher, or to the whole class. There's no in between. You will have documentation for everything that students post as they will have to be logged in to access your class, and students can attach assignments to their posts to turn into you as well.

    I think that this is a fantastic tool that could be a great use of social media with your classroom!

    Tuesday, February 8, 2011

    Prezi.com for Math!

    I'm in Austin this week at TCEA and have been learning about so many cool tech tools and tips that I have to share some. Just today I heard from a 3rd grade teacher that is using Prezi with her students to map out "blueprints" of math problems. (If you don't know about Prezi go check it out at www.prezi.com and visit their "Learn" tab as it is a great & fun alternative to PowerPoint.) The idea is that students first map out their work of a math problem. Then after viewing a sample Prezi, the students create a mind map (she used paper & pencil) of how they would like to set-up their math blueprint in Prezi so that they can teach it to the class. The students then use Prezi and create their presentation that they can later share with the class.

    To create an educator Prezi account you can click here. The free version is great! If you have any questions please let me know and I'll be happy to help!

    Wednesday, January 26, 2011

    Twurdy.com, Search by readability


    Twurdy.com has the purpose of providing Google search results that are color coded by readability. Their philosophy is...
    Everyone has different reading abilities. Some people searching the web are university professors and others are 5 year old children. Twurdy has been created to provide people with access to search results that suit their own readability level. 
    Since it runs off of Google search you can type in the same things that you would type into the search of Google. You'll notice that it takes a little bit longer to see the search results. This is because Twurdy is looking at the level of vocabulary used on the site in order to code it. There are even three different ways that you can search with Twurdy: Just Twurdy, Simple Twurdy, or Twurdy with Pop.


    If you're in more of a hurry a Simple Twurdy search may be the best choice, but if you want the results to be the most accurate then Twurdy with Pop may be the way to go. The FAQ page of the Twurdy site contains more information about these different types of searches, as well as more information.

    Thursday, January 20, 2011

    Manage Sign-Ups Easily

    www.signupgenius.com seems to offer a pretty convenient service for those of you that need to create or manage group sign-up lists. You do have to create a free account, and then click to "Create a Sign Up". You choose the type that you want from Party or Potluck, Volunteer or People, or a Food or Munchies sign up. You can pick a theme to apply to the sign-up page, enter the dates, and the items that you would like people to sign-up to bring or do. The last step is just to invite participants via email. Easy numbered tabs walk you through all of the steps. Those that you invite will receive an email that links to the site where they can enter there sign-up selections, and you get an easy record of all of it!Visit the How It Works page of the site if you want to learn more. 

    Wednesday, January 19, 2011

    Braineos...Online Flashcards & Games

    Braineos.com is a place for online flashcards and games that use the flashcards. One of the best things about the site is that many sets of these flashcards have already been created by others and you can easily search the library of existing flashcards on the homepage of the site. If you don't find what you're looking for, just create your own.

    To create your own set of flashcards, just click "Go" from the homepage, or if you've conducted your search and don't see what you're looking for click "Login and create your own flashcards!". From here you can login using your account from a variety of sites including Google and Facebook.

    Once you're logged in, enter a deck name and then a description and tags if you want. Click "Create" and you're well on your way! You can enter your questions or vocabulary one at a time, or from a list. It's super easy!

    Once your list is created or if you're using flashcards that have been created by another user, you can choose which game you want to use with them then click "Play".http://www.braineos.com

    Dollar Days from Scholastic Teacher Express

    This was just too good of a deal that I felt I had to re-post. Cindy Tucker shared on her blog about one dollar downloadable books from Scholastic Teacher Express. They are downloadable in pdf form so that you can easily view them on your computer.


    The Dollar Deals ends on January 31st, so check it out soon if you're interested. For more info please be sure to check out Tucker Tech Talk!

    Wednesday, January 12, 2011

    Sweet Search, A Search Engine for Students

    Sweet Search is a search engine that was created for students. All of the results that are displayed when a search is conducted have been reviewed by educators, librarians, or other experts. The intention is for students to be able to "find outstanding information, faster". It seems to me that the results are intended to be reliable data for student research. I do not believe that this site is ideal for being your main search engine, but I certainly think that it has a place. I see this site as being a great tool for teaching students about reliable data sources, and for finding reliable data about a topic quickly. More information comparing the search results of Google, Bing and Sweet Search can be found on The Finding Dulcinea Blog. I hope you enjoy!