Wednesday, December 15, 2010

min.us - Share a pic, so easy!

It doesn't get any easier to share an image (in my opinion) =) If you have one picture or even a few that you want to share with others, just open your browser and type in the address, min.us. From here, it's as simple as dragging your picture(s) over to the window, or clicking the Select your Files link and going from there. As soon as you do this you will see a page with your image(s) and a small window that details the pictures and includes links. The link that you want to share is at the bottom of the window. For an example go to http://min.us/mvbnZx9. This example is of 5 pictures, just click the one you want to view.

It's not necessary to even create an account, but if you want to easily access your picture galleries later, you may want to register. Thanks to my coworker Ricky Gode (and his informant Josh Davis) for this site! =) Enjoy!

Tuesday, December 7, 2010

Shwup...Create Videos from Multiple Sources

www.shwup.com
Shwup provides a way to make one movie out of pics and videos from multiple people. The site has a video introduction on their webpage that I highly suggest you take a look at if this concept interests you. To begin, you do need to create an account on the site (it just asks for your name and email address). The good thing is that people you invite to contribute media to the video do not have to create an account. In fact. according to shwup.com...
"For those invited, there is no signing up, registering, or download required to view and contribute photos and video. To contribute to the album, it's as simple as replying to the email with an attachment..."
 Once people have contributed media to your album, you can create what Shwup refers to as a "muvee". You can choose the music and media that you want to include and then easily share the muvee with others.

Thursday, December 2, 2010

Favorite Keyboard Shortcuts

Keyboard shortcuts are something that many people are familiar with. Some (like me =) use them on a daily basis, and others just here and there. There are multiple shortcuts that are well known and loved, and then those that I think tend to get forgotten. All of this to say, here are my top 10 (plus a few) favorite keyboard shortcuts…

FYI, for Mac users substitute the Command key for Ctrl
  1. Ctrl + X = Cut, think of the X as a pair of scissors to help you remember this one. 
    Ctrl + C = Copy
    Ctrl + V = Paste, I remember this one as V for Velcro
    (I know that was actually 3 keyboard shortcuts but they’re all very related so they count as one here)
  2. Ctrl + Z = Undo, this is one I could never go without!
    Ctrl + Y will re-do whatever you have undone.
  3. Alt + Tab = Switch between open programs, continue to hold Alt and press Tab again to switch to a different program all with your keyboard. This is great for a quick change during a presentation!
  4. Windows + D = Shows your desktop (btw, the windows key is found right next to the Alt key on your keyboard Smile)  It will minimize all programs and windows that you have open so that you can access your desktop items. Press Windows + D again to show all of your windows.
    Mac users = F11 for same function
  5. Ctrl + D = Duplicate, now I know what you’re thinking, isn’t duplicate just another word for copy, the answer here is no. The Duplicate function actually serves a fantastic purpose. To use it in it’s full glory I recommend opening a PowerPoint slide.
    - Insert a small picture or a small shape
    - Click to select the item then press Ctrl + D on your keyboard (do not touch your mouse here… yeah I’m serious :)
    - Use the arrow keys on your keyboard to move the image over so that it sits right next to your original picture.
    - Press Ctrl + D on your keyboard, and watch as the next image is placed with the exact same spacing next to this image…magical!! If you continue pressing Ctrl and press D  more times, the pattern will continue.
    (You can use this same tip for multiple items, for example, if you get grouping of images that you want to duplicate, just hold the Ctrl key and click to select all of the images, then use Ctrl + D)
  6. F6 (when in Internet Explorer or Firefox) = The address bar being highlighted. This makes for fast typing of a different web address.
  7. Ctrl + Enter (when entering a web address in Internet Explorer or Firefox) = www + .com, Let me explain this one a little bit further. When you are in an internet browser entering a web address to go to, instead of typing out the www.(websitename).com, just enter the website name, then press Ctrl + Enter. For example type in emsisd, then press Ctrl + Enter and your web browser will go to the full address.
  8. Ctrl + F = Find, use this keyboard shortcut anytime you want to find a specific word or phrase in a document or website!
  9. Windows Key + F = Search, use this to search for a document or file on your computer.
  10. Ctrl + A = Selects everything, in a document this means the text and images in the document, in a folder you are viewing this will select all of the items in that folder.

Wednesday, December 1, 2010

Wolfram Alpha...More than a Search Engine

This week the Webby Wednesday site is Wolfram Alpha www.wolframalpha.com. Wolfram Alpha describes itself as a "computational knowledge engine"...what does that mean? Well for starters, when you enter something into the search window on the site, the results that you receive will not be a list of websites. When you search for something, Wolfram Alpha gives you results about whatever you searched. For example, when searching for "Saginaw, TX" I received the following results...

This was just the beginning. Additionally, I received a local map, the local time, current weather, median home price, crime rates, and geographic properties. 

By entering a math problem in the search window, and I pretty much mean any math problem, Wolfram Alpha will yield the results of the equation in detail.

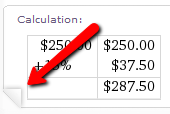
In the information boxes that you receive from a search, you have the ability to save the information as a picture or in plain text. To do this, hover over the page curl that appears when your cursor is in a box. Once you do this you will see the links to "Save as Playlist" or "Copyable Plain Text".

To get a better idea of what Wolfram Alpha is capable of, I highly recommend that you click to view "Examples by Topic". You will find this link from the homepage (under the search window). To see even more, once you have completed a search, to the right of the page reference the "New to Wolfram Alpha?" section.

If you find more super uses, particularly for classroom use please reply to the post and share =) 

Enjoy!


Wednesday, November 17, 2010

Simple Booklet...Fast & Easy Web Flipbooks

Simple Booklet provides one of the easiest platforms that I have seen for fast web publishing. Why would you want to use it? Well, who wouldn't want to make a fun, and interactive "flipbook" to communicate information?

To get started, just click on Create (creating an account is optional, but it does allow for you to save your booklets for later editing). You will see a screen with a simple toolbar, and a large area that says Click Anywhere to Add Content. It's that easy! When you click you will see a window of options. If you want to change the background just click Background, add text? click Text, and if you need to add a video just click Video. I think you get the idea =) You can even resize your flipbook by dragging from the bottom-right corner. Once you've added content you can click and drag your content around on a slide easily. When you need another page, just click the small page-turn corner that's found to the upper-right of your book (if you need to go back click the one on the left).

When you're finished with your flipbook click the Publish  button to see your options. You can publish it publicly, get a short url (ex. http://midd.me/jUrw), and also get the embeddable code to add your flipbook to your website (see below)!

Monday, November 15, 2010

Scholastic Study Jams...for Math & Science

Scholastic has a site with some pretty cool, and brief, math and science videos. Click on "Math" or "Science" from the menu to view all of the topics for that subject. Click the topic that you want to view to see more options. It's easy to get started just go to http://studyjams.scholastic.com/. I learned about this site from Kelly Tenkley and her iLearn Technology blog.

Wednesday, November 10, 2010

Quick Notes or To-Do's....Knowcase.com

Ever find yourself in need of jotting down some quick ideas or even needing to create a to-do list (I know...ha ha)?? I know it would be even better if we could find a way to complete our to-do lists immediately...but until we figure that out, at least there's an easy way to keep your list organized. Knowcase.com provides a straightforward, easy-to-use format for creating quick lists. Even better is that you can share these lists with others so that they too can get to to-do-ing =)

To get started, just go to www.knowcase.com and click Start a new page. Yep, it's that easy...and creating an account is even easier. You can just enter your email address and a password (found to the right of your document), that's it. Creating an account will save your list with your account so that when you login to the site in the future you will have your document.


To enter text and items on the site, just use the toolbar buttons found at the top. You can also primarily use your keyboard to make your list or jot down your ideas. Pressing enter will start a new line and tab on your keyboard will indent. If you want to make an item a to-do item (with a handy little checkbox), just click Todo from the toolbar. If you need to move the order of your items around, just click and drag from the left of the items.

You'll find the options for sharing your document at the bottom of the page. If you haven't created an account you have the option of sharing with specific people. Just click on Share and enter your name and the recipients email address. When you're logged in, you will also have the option of making your document viewable and editable by only You or by Everyone. Just click the words next to the images of the eye and pencil to change these options.

Classroom Application
I can see Knowcase being used by teachers for organization or in a class setting used during a brainstorming activity. I also think Knowcase could provide a great platform for students organizing their ideas. When they're done they could just share their list with their teacher via email!

Enjoy!

Wednesday, November 3, 2010

Weblist...One page of web shortcuts!

weblist.me

Weblist.me is a site designed to put links for multiple websites in one place. Weblist.me puts the web addresses that you enter in an easy-to-use format that would be great for student use.

To get started just go to Weblist and fill in the websites that you want to use. Creating an account for this site is entirely optional. You can just start entering the web addresses that you want to use. Just click the plus sign to add more links.


I did find that the "Add Media" option wasn't always successful for me so I stuck to just using the websites. You'll want to add a name for your weblist, and know that the name you enter here will be used for the site address. Once you click to Create List a window will display with several important addresses. The first address is the one that you want to share with students and others for them to access your weblist. The second address is one that you want to be sure to save so that you have the option of editting your weblist in the future. Once you close the window you will see your completed list. I really like that the sites are tiled so that you get a preview of what's on the webpages.


How does this get even better?? =) Well when you click a link from your weblist page the site will display with a small toolbar at the top. From this toolbar you can click the arrows to move through the different pages from the weblist or just hover over the name of the page to view the other pages in a list.


Classroom Application
Teachers can create weblists for their students to use for research or to introduce a skill or concept. Students can create their own weblists for projects by linking to different webpages and videos. 

Check out the weblist I made http://weblist.me/Onlineclassroomtools-0 for an example and some great classroom tools!

Tuesday, November 2, 2010

RSS Feeds...What are they and are they useful to me??

RSS feeds have been a part of my life for a while now, so I forget sometimes that others are not aware of the benefit of using them and the time that they can save you. If you're in the habit of checking your favorite sites regularly for new and updated information, then RSS feeds are certainly for you! To take advantage of RSS feeds you need an RSS Aggregator or Reader. I use Google Reader for my RSS feeds because it's online and free. Want to try it out? I think the video below does a good job of explaining the function of Google Reader and how to use it.


More sites than you may realize contain RSS Feeds that you can subscribe to including most all news sites, blogs, and podcast pages. If you see an image on a webpage similar to the one below, then it has an RSS feed  that you can subscribe to.

Usually you can just click the image and select to subscribe to the feed, or copy the address of the page and paste it into your Reader. Take a look at the RSS feed button at the top of this blog to see what I'm talking about...and feel free to subscribe =)

Great Online Timers...

It was brought to my attention that an online timer I had posted about previously was no longer online. That got me looking around for other online timers, and I have found several that serve some different purposes fantastically...

How often have you told your students, "You have 10 minutes to complete this activity.", only to lose track of time thereafter. Luckily, there are many online timers that make it quite simple to track your time. Even better is that many of them put a large display on your computer that you're students can see to monitor their time.

e.ggtimer.com - There's a couple of things I really like about this timer. First, you can actually type in the time you want to use for the timer in the url, for example, e.ggtimer.com/5minutes, would automatically pull up a website with a countdown from 5 minutes. You type in any time amount here, as well as a few other cool things that you learn about on the site's main page.

Online Stopwatch - This site can serve as a stopwatch or a timer. To use the stopwatch click the green arrow stopwatch link. You'll then be taken to a page that will allow you to start the stopwatch. If you need go back to the main page just click the provided "back" link. To use the timer function of the site, click the "Count Down" red arrow. Use the buttons on the screen to set your time, then click the "Set" button. From here you can start the timer.

timer.onlineclock.net/ - This is a simplistic timer that can be shown quite large on your screen. Just use the links in the upper-left to adjust the size. Use the drop-down menu under the timer to set a time. The timer will begin as soon as a time is selected.

Monday, November 1, 2010

ELECT.IO...Election Candidate Information

ELECT.IO provides an easy to understand format for finding out some information about candidates for different positions in our local election. It's easy to use, just go to elect.io (all you have to do is type that in your browser), and then enter your zip code and Find Elections. You'll see a tab for each position that is up for re-election and the number of candidates running for said position. If you click a tab you will most likely see more information about the individual candidates.

Wednesday, October 27, 2010

Storybird...Create collaborative stories online!

Storybird.com provides a great, and easy to use platform for creating stories online. To start, from http://storybird.com click on Start a Storybird Now. You'll then be able to browse and select the artwork that you'd like to base your Storybird on (this is my favorite option), or scroll down the page and explore by theme (also a good choice =). You can click to See More Art or See More Themes from both of these areas. You can also click Reload from the Image pages to view even more artwork! Once you decide on the artwork that you would like to use, click to Start a Storybird with this art. This is where the fun really begins...


When you see a screen similar to the one above, you are ready to roll. The artwork group that you selected will be displayed to the right and left of your Storybird book. If you can't see all of the images, no worries, just move them around on your screen. You can click and drag them to a different spot, or just click once to view it larger! To place an image on the Storybird just click and drag it onto the page. The location of the image on the page will depend on where you place it. If you put the image more to the right side of the page then you will have a place to type on the left, and vise versa.

The story board for your Storybird (try saying that fast 3 times!) is below your book. From here you can add or remove pages, as well as re-arrange the order of your book (just click and drag). Don't forget to click on the cover of your book from here to add the title and author.

You have the option to just Save, or to Publish your story (publishing means it's open to the public). You can also invite a collaborator to the story so that they can "jump in" and add to the story where you left off. If you want to save your Storybird, and you have not yet created an account, you will be prompted to do so at this time. 

Classroom Application

Write a Storybird with your class. Have students give input as a class and publish online for the students and parents to access. Additionally, Storybird gives you the option of creating a class with your login, and adding students to the class (all for free!!). Students are given a username and password in the system that they can use to create Storybirds that you as the teacher will be able to access. You can also give an assignment to the students on the website for creating a Storybird. They will see the assignment when they login!

*Make sure if you post student work online that you have the necessary approval from their parents/guardians. 

Have fun and enjoy!

Wednesday, October 20, 2010

Pixlr...Photo Editing Services

www.pixlr.com
Pixlr provides a great online application for editing photos. So you may ask...what makes it different from other online photo editors?? Well for starters, you don't have to register for an account so it is quick and easy to start using the application. 


Even better, Pixlr offers you a couple of options for editing your photos. If you're a beginner with photo editing, Pixlr Express is a great place to start. It offers cropping and resizing tools, as well as adjustments and effects that you can apply to your image. 

If you are familiar with products like Photoshop, then you will be quite comfortable using the full Pixlr Editor. The editor will allow you to import your own images and it gives you the option of creating an image from scratch. In the Tools window you will also find red-eye fix, blur, clone, and many more correction and editing tools.

When you click on either of the options (Editor, or Express) you will first see a window that prompts you to select your image source (or create a new blank image in Editor). Once you make your choice, you will see the application with the toolbox on the left. 


Enjoy! 

Thursday, October 14, 2010

Snappy Words

The site this week is www.snappywords.com, an online visual dictionary. What exactly does this mean? Rather than the traditional definition format that you are used to seeing when you search for a word in a dictionary, you will see a graphical representation of different words that explain the meaning.


When you first go to Snappy Words you will probably notice the web of words that appears. This word is generated randomly by the site when you pull it up. The word in the middle of the web is the main word, with the lines and colors that connect to the other words representing various things.


Even more fun is the fact that the word web is interactive. Click and drag to move the web around, scroll up or down to zoom in and out, and you can even click on a word and move it to a different location. You can even hover your mouse on any of the words in the web to see more information. To see the meaning of the various lines and colors, view the key that is found below the word display. If you're wondering what dictionary Snappy Words uses.... 
"The Snappy Words interface queries the WordNet lexical database developed by Princeton University and made available for students and language researchers. This dictionary groups synonyms into synsets through lexical relations between terms. These meanings and semantic relationships are revealed graphically by the interactive web technology made available by Snappy Words." -www.snappywords.com
To search for your own word just enter it into the search window that is found in the upper-right portion of the page. Now do I think this a replacement for the traditional dictionary? No, but I do think it is a fun change of pace that will stimulate some thought with your students. Once students have seen and used the site, maybe they could come up with their own "visual definition" of a word.

Wednesday, June 2, 2010

Jeopardy Labs

Summer is soooo very close, and I know you'll be sad to hear it...but it's the last Webby Wednesday of the school year =( I'm going to leave you this year with a website that provides an online platform for creating Jeopardy style games for your students. I know some of you do some planning throughout the summer, so if you do, and even if you don't, keep this site in mind in the future...
The website is http://jeopardylabs.com. To get started just click Start Building (this is the free way). You will be prompted to create a password. Just make sure you remember your password because you will need it if you want to edit your game in the future. Once you click Start Building, you will then be taken to the edit screen. Building your Jeopardy game is easy, just click to edit the Title and Categories, and click on a point value to enter an answer and question (think Jeopardy style). Just complete as many questions and answers as you'd like, and then when you are finished, make sure you click Save at the bottom of the page.

Once you Save, you will be given links to your game. Make sure and bookmark and/or save the web addresses. When you play the game with your students you can pick the number of teams playing, and then keep record of the scores on the website by click the + and - buttons.

You can find many Jeopardy games already created on the site by clicking on Browse from the homepage (that's where I found the following sample, http://jeopardylabs.com/play/5th-grade-end-of-year-test).
Happy Summer and Enjoy!

Wednesday, May 26, 2010

Sheppard Software

Sheppard Software offers one online stop for many learning games and activites in the content areas of Language Arts, Math, Science, and Social Studies.
Many of the activities are very brief and offer a great way to reinforce a concept. In addition to the games there are also quizzes over the topic areas of Chemistry, Health, History, Nutrition, and Seasons.

There are quite a few Geography activities/quizzes that can be found on the site by clicking on World Geography Games or US Geography Games at the top of the page. The games are all based upon the idea of locating a requested area/country/city on a map.

In the Science section of the site you will find activities on the topics of dinosaurs, seasons, life cycles, cells, endangered animals, and deep sea science. Several different life cycles can be re-enacted on the Sheppard Software site. The life cycles of the butterfly, frog, and bird are all accessible and operated by the user placing the stages of the life cycle in the correct order.

In the Math section of Sheppard Software there are activities on basic operations, mixed operations, fractions, place value, time, money, early childhood math, and pre-algebra.

Language Arts activities that are found through the site primarily pertain to various parts of speech and vocabulary (all the way up to SAT and GRE vocabulary prep).
Take a look at Sheppard Software and see what activities would be helpful to your students. With the "game-like" environment of some of the activities, some students may even find this site as a fun place to spend a little time this summer on a rainy day =)

As always, please feel free to leave a comment and let us all know how you are using this resource in your classroom.

Wednesday, May 19, 2010

Picture Book Maker


The Picture Book Maker is an easy to use site that allows you (and your students!) to create a book. The site supplies the images, you just supply the words. No registration is required to use the site, which makes the site ideal for younger student use. When you arrive at the site you will see three options. To begin your book, click Enter


From there you will be in an open book, looking at the first and second pages. To add pictures to your page, just use the images found at the bottom of the page.


You will find backgrounds to the left, characters in the center, and objects on the right. Click the arrows to page through the different choices. To use one of the images just click it. A background will automatically go in your book, but with the characters and objects you then click where you would like to place it on your page. You can choose between different actions for your character once you place it in your book by moving the slider titled Actions. In addition, you can also scale the images once you place them in your book by moving the Scale slider. 


To add text to your book click the pencil, then click into your page and type your text. Click and drag on one of the corners to move the text box to a different location on your page.


One thing that I found kind of odd about the site is that it does open you to the first and second pages, not the cover of the book. Just remember to click the C in the pages below your book to design your book cover.
When you are finished with your book click Finish to view your book and see more options. From this screen you can print your book, or email the link to the book to someone.


Enjoy!

Wednesday, May 12, 2010

Math Manipulatives

The Math Manipulatives portion of the Math Playground site offers some great Math tools. You will find Fraction Scales, Fraction Bars, Decimal Scales, Probability Spinners, Pattern Blocks and many others. The tools allow you to manipulate and add your own information to solve or explore a problem.
Fraction Bars (pictured above) allows you to set the numerator and denominator for each row by sliding to a different value. The number titles can be turned on or off.

Classroom Application

No registration is required to use the site which makes it easy for teachers and students to use. Teachers can use the products to illustrate problems and concepts. These tools can also be used by students to assist them in solving problems.


Have fun and enjoy!

Wednesday, May 5, 2010

Score Clicker

This week the Webby Wednesday site is a resource that you can use for keeping track of scores for two different teams during a game in your classroom. It is called Score Clicker.
The best thing about the Score Clicker is the easiness of personalizing it for your own class. Just click in the Team fields to enter your own team names. Then click the 5, 10, or 20 buttons to add points to the teams. It's a fun and easy representation of the points earned, and students will love to see the points added to their respective teams.

Enjoy!

Wednesday, April 28, 2010

FotoFlexer

Have you ever needed to make a quick change in a picture (or maybe a few changes :) before you added it to a presentation or uploaded your image to your website?

FotoFlexer provides a quick, easy, and free online tool that allows you to edit your pictures and even add text. To use FotoFlexer just go to fotoflexer.com, and click the Upload Photo button (if you want to just try the product there are sample images you can use as well).

Your image will open with the basic tools showing. With the basic toolbar you can fix red eye, crop, resize, rotate, flip, and/or adjust the color/contrast in your picture.

Just click the tool that you want to use and fotoflexer will tell or show you what you need to do next. On the other tabs you will find tools for adjusting or adding effects to your picture, including text! When you are finished editing your image just click the Save button and choose where and how you want to save your file.

Wednesday, April 21, 2010

Simple Timer

This website provides a large Simple Timer that can be displayed on your computer/projector. You can have the timer simply run, or set it to count down from a specific number of minutes. Simply choose the option you prefer, then click Start the Clock.

Timer options with image of timer


The clock will turn green when it begins counting, and will sound a gong when time has expired (if you have set the clock to count down).

Use this tool anytime you are in need of a timer in your class. Just bookmark the site on your computer so that it is easy and fast to access! If you like the Simple Timer you may also want to check out the One-Minute Timer.

Wednesday, April 14, 2010

Wordle

Wordle provides an easy way to create word clouds. If you haven't created a word cloud before, a word cloud looks something like this...


Word Cloud with State Names
(These states were not picked at random...do you know the significance?)

Wordle will create a word cloud that is compiled of words that you (or your students) paste or type in. The site includes the feature of skipping small and common words (a, then, and...). You can change the way that your word cloud looks in Wordle by using the Font, Layout, and Color menus at the top of the word cloud window. If you're looking for a quick change use the "Randomize" button to generate a change.

It's free to use and you don't have to create a login. Just head over www.wordle.net and click "Create"!

Simply print your word cloud (or just save it in pdf form) when you are finished or take a picture of it on your screen using a free capturing tool...like Jing! To learn more about Jing head over to Cindy Tucker's blog at www.emsisd.com/ctuckerblog!

Classroom Application
Wordle can be used for many purposes in the classroom...from typing in words that describe an object or common theme (like the word cloud above), to students pasting in their own writing to create a word cloud. If students paste in text from their own writing, Wordle can serve as a great tool for identifying words that are used frequently (possibly too frequently) in their own writing because those words will be larger in the word cloud!

In looking for resources on using Wordle in the classroom I came across 45 Interesting Ways to use Wordle in the Classroom. It's a compilation of different ways that Wordle has been used by teachers...check it out!

Wednesday, April 7, 2010

fur.ly

Welcome to another week of Webby Wednesday! This week I'd like to introduce you to a helpful tool for grouping websites for students. Enter...fur.ly!

fur.ly

To get to the Furly site simply type the site address as fur.ly. Once on the site you will find a place where you can type or paste in multiple web addresses (enter one address and you will see a place for an additional address). Furly then takes those addresses and creates one URL for all of those sites. To see Furly in action visit the following link http://fur.ly/kkw (you will find multiple websites that all have educational video resources). At the top of the Furly created web address there will be a menu bar that allows users to browse through the various sites that were entered into Furly (see example below).

Screenshot of fur.ly Menu Bar


With the toolbar users can then page through the websites with the arrows, or click the drop down menu and select a different site in the list to view.

Classroom Application
Teachers can stipulate the websites that they would like students to use by directing students to one fur.lyaddress rather than trying to list out multiple sites for the students to enter on their own.

Wednesday, March 31, 2010

Scribble Maps

This post marks the start of Webby Wednesdays (Yay!!). Every Wednesday of the school year I will be posting a website that I have found and think might be helpful to teachers and students. The first Webby Wednesday site (drum roll please....) Scribble Maps!


Scribble Maps provide an excellent place to virtually draw, mark-up, and measure on a map. The site integrates with Google Maps, which makes the format recognizable and easy and to use. You will find tools for drawing or marking on the map in a toolbar at the top of the page.


One of the nicest features I found was that the line tool also shows the distance from the start to the end of the line. This enables you to map out a path and know the distance, or to find the most advantageous way to get somewhere.


Classroom Application
Teachers can use Scribble Maps in place of a classroom map when you are wanting to mark specific locations on the map for the students to see. Since there is no registration required to use the site, students can also use Scribble Maps! Students could simply zoom in on a particular area, and mark landmarks/locations on the map using a place marker and the text tool on the site. Additionally, students could plan a route using the line tool on the map and note the distance of that route (shown automatically with the line tool), ultimately trying to find the most efficient path.

Please leave a comment and share how you are, or will be using Scribble Maps in your classroom!

Friday, March 5, 2010

Tagul

Tagul is a great tool for creating word clouds that contain word tags. Basically, you can copy and paste text in, or put in a url for Tagul to grab text from. Tagul then takes that text (or the text from the url) and puts the main words into a word cloud with the more frequently used words appearing larger in the cloud. Additionally, by default the words are all tags that link to a Google search of that word. You have edit options concerning the shape of the word cloud, fonts and colors used, and you can remove a word from the word cloud that is in the original text entry. What's even better is that the Tagul word clouds are embeddable on your web page. There is no saving or uploading of a file, you just have to copy the code from the cloud and paste it into the html section of your website. 


There is no saving or uploading of a file, you just have to copy the code from the cloud and paste it into the html section of your website. 

Sunday, February 28, 2010

A Shiny New Presentation with Prezi

While PowerPoint still provides an easy and practical way to produce quality presentations that are easily operable, I have found a new (to me) presentation tool that I have already had some fun with. Prezi.com provides an all online application for creating a new style of presentation. I have used www.prezi.com to re-format other presentations, and am working to create new presentations as well on this site. In Prezi your presentation can literally jump from topic to topic, and reach embedded videos and media, as well as zoom in to finite points that you want to make. I encourage you to dabble in this tool and learn as you go. I found after creating my first presentation that I had a much better concept for creating my second. From experience I can tell you that I found my audience more captured (or enamored =) by this presentation that I had with my more recent products. While I would not use this tool for every presentation need I have I will surely continue to use it every now and then to change things up a bit.

Tuesday, February 16, 2010

The possibilities of Glogster

I spent my time last week at a technology conference where I was reminded of some technology tools I was familiar with and some that I wasn't. In reflecting about the conference I found I was focusing more on the tools that I was familiar with but might have skimmed over previously, not noticing or recognizing the opportunities that they provided. One of these is Glogster. For those of you that do not know, Glogster is presented as an interactive poster. At first glance I thought, why do I need this?? Don't websites, blogs and wikis provide enough interaction? How wrong I think I was. The format of Glogster makes it easy for even a novice to add text, movies, sound clips, and pics while glitzing them up in a way that is sure to gain the attention of many students. The beauty is that with the educational side of Glogster, edu.glogster.com, an educator can create an account for his/herself and receive logins for students. The students can create their own Glogs, and then the teacher is the only one that has the right to publish the projects. I find this most appealing for those students that are not comfortable with or cannot have information posted on the web. I look forward to introducing this site to teachers and seeing the projects that students create!

Monday, February 15, 2010

Getting Started

So my plan for this blog is to post the new (at least to me) technologies that I've found or learned to use with education. My job is as an Instructional Technologist/Technology Trainer for a school district. I am constantly searching for new tools to use with the teachers and students in our district. I will share those technologies that I find, and the experiences that I have with them. More to come soon...